![]()
How to Screen Share on Microsoft Teams for Mac
Screen sharing in Microsoft Teams is a powerful feature that allows you to share your entire desktop or specific application windows with meeting participants. To use this feature on a Mac, you must grant Microsoft Teams the necessary permissions to record your screen. This guide will walk you through the steps to enable screen sharing permissions for Microsoft Teams on your Mac.
Prerequisites
- Microsoft Teams App: Ensure you have the Microsoft Teams app installed. You can download it from the Microsoft Teams website.
- Administrator Access: You may need administrator access to change certain security settings.
Step-by-Step Guide
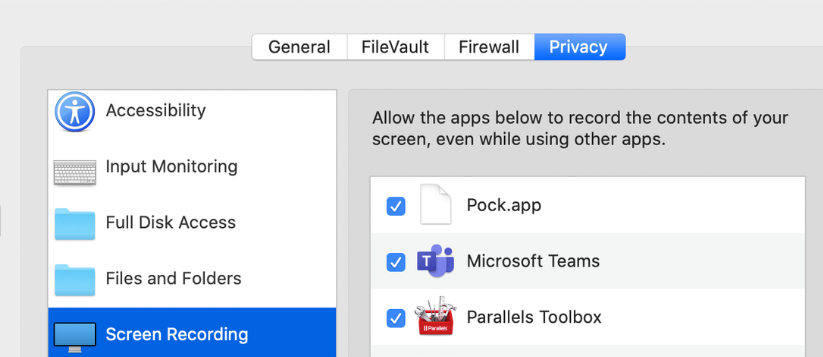
Step 1: Open System Preferences
- Click on the Apple menu () in the top-left corner of your screen.
- Select System Preferences from the dropdown menu.
Step 2: Navigate to Security & Privacy
- In the System Preferences window, click on Security & Privacy.
Step 3: Adjust Privacy Settings
- In the Security & Privacy window, select the Privacy tab.
- In the left-hand sidebar, scroll down and click on Screen Recording.
Step 4: Grant Screen Recording Permission to Teams
- If the Screen Recording option is locked (indicated by a lock icon in the bottom left), click the lock icon and enter your Mac’s administrator password to unlock it.
- Find Microsoft Teams in the list of apps. If it’s not listed, you’ll need to open Teams and start a screen share to prompt the system to request access.
- Check the box next to Microsoft Teams to grant it permission to record your screen.
Step 5: Restart Microsoft Teams
- After granting the necessary permissions, you need to restart Microsoft Teams for the changes to take effect.
- Close Microsoft Teams completely. You can do this by right-clicking the Teams icon in your Dock and selecting Quit, or by using the Command + Q shortcut.
- Reopen Microsoft Teams.
Step 6: Verify Permissions
- Join or start a meeting in Microsoft Teams.
- Click on the Share Content button (it looks like a rectangle with an arrow) in the meeting controls.
- Select either Desktop or Window to share your screen. If the permissions are set correctly, you should be able to proceed without any issues.
Troubleshooting Tips
- App Not Listed in Screen Recording: If Microsoft Teams is not listed under Screen Recording, make sure you have attempted to share your screen in Teams at least once. This action prompts macOS to ask for screen recording permissions.
- Permissions Not Taking Effect: If screen sharing still doesn’t work after granting permissions, double-check that the checkbox next to Microsoft Teams is selected and restart your Mac.
- Updates: Ensure that both macOS and Microsoft Teams are updated to the latest versions. Sometimes, updates fix permission-related issues.
Conclusion
By following these steps, you can successfully enable screen sharing for Microsoft Teams on your Mac. This allows you to fully utilize Teams’ collaborative features, enhancing your virtual meetings and presentations. If you encounter any issues, refer to the troubleshooting tips or consult Microsoft’s support resources for further assistance.


